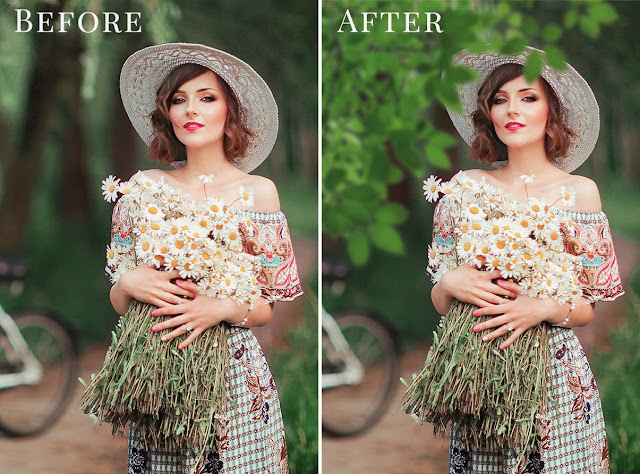
75 Floating Dust Photo Overlays Free Download Drag one of these 75 overlays on your photo to compose dusty, cloudy and particle-spangled images and to ensure neat effects of vortex. You can expect textures with an almost bokeh-like effect, dense fog, sparkling fountains and galaxy-like structures. Photo Overlays Lay the textures over your images quickly and easily by using JPEG files applicable with most image-editing software. Plus, use our video instruction and tech support for free!
Portrait, fantasy composition, architecture or nature shots, whatever… – with floating dust you can turn any picture into a magic creation. Move the dust to the right place, adjust the size, and it is done! Spin dusty clouds in your photos and pictures: with 75 textures of dust, particles and powder, it’s no problem at all! Look at the examples, get the dust overlays pack and just add the dance of particles.You Can Also Download 2500+ Professional Photo Overlays Bundle
DETAILS:
75 photo overlays high resolution (5000x3000px – 300dpi – JPEG)
Compatible with any software that allows you to work with layers ( Photoshop, Photoshop Elements, Paint Shop Pro, PicMonkey, Gimp and etc.)
See what you will be able to do
Below you can find Preset Power Examples from each Package.


Download the File Easily From the Download Link Given Below
Password is: dgpik.com
How to Use Photoshop Overlays
- Open your image: Launch Adobe Photoshop and open the image you want to edit by going to “File” > “Open” or by dragging the image into the Photoshop workspace.
- Prepare the overlay: Find and download the Photoshop overlay you want to use. Overlays are typically image files with transparent backgrounds, such as PNG files. Make sure the overlay file is compatible with your version of Photoshop.
- Import the overlay: In Photoshop, go to “File” > “Place Embedded” or “Place Linked” to import the overlay file. Browse your computer and select the overlay image file. Click “Place” or “Open” to import it into your Photoshop document.
- Resize and position the overlay: After importing the overlay, it will appear as a new layer above your base image. Use the transformation handles (the squares around the edges) to resize and adjust the overlay’s position. Hold the Shift key while dragging to maintain aspect ratio.
- Blend and adjust the overlay: To blend the overlay with the underlying image, adjust the blending mode and opacity of the overlay layer. The blending mode can be found in the Layers panel, usually located at the top left corner. Experiment with different blending modes (e.g., Overlay, Soft Light, Multiply) to achieve the desired effect. Lower the opacity if the overlay appears too intense.
- Refine the overlay: Depending on the overlay and the effect you want to achieve, you may need to refine the overlay further. Photoshop provides various adjustment tools and filters to modify the appearance of the overlay layer. For example, you can use adjustments like Levels, Curves, or Hue/Saturation to fine-tune the colors and tones of the overlay.
- Masking and erasing: If you want to apply the overlay selectively to certain areas of the image, you can use layer masks or the Eraser tool. Layer masks allow you to paint with black on the mask to hide parts of the overlay or white to reveal them. The Eraser tool allows you to manually erase portions of the overlay layer.
- Finalize and save: Once you are satisfied with the overlay and its placement, save your edited image by going to “File” > “Save” or “Save As.” Choose the desired file format (e.g., JPEG, PNG) and specify the destination folder.
By following these steps, you can effectively use Photoshop overlays to enhance your images with creative effects. Remember to experiment and explore different techniques to achieve the desired result.


