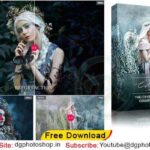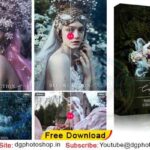


Watercolor Portrait Photo Masks Free Download Add the watercolor formations to your pictures. For example, let garments melt or superimpose gloomy images with veil-like shapes with the help of 15 PNG overlays + 1 JPG texture shot with patterns from the changing interplay of liquid. Quickly and easily, overlay watercolors on your portraits from gentle waves to dense swirls – make your pictures a worthwhile addition to the dynamics and atmosphere. Get the watery pictures and dive into creative worlds! Add the floating formations to your designs in just a few clicks. To create the effects, first select the pattern you want and place it over your image. After that, all that remains is to place the liquid pattern in the right place and to adjust the size and color. Watercolor Rectangles Photo Masks
You’ll get a wide range of different patterns that can be opened with most popular image editing programs. Grab these splendid water-based shots from photography professionals and use them as effects, overlays, picture elements, or background. Dive in and get creative!
Details:
- 15 PNG elements, to see the size of each image, please, look at the preview #7
- 1 Watecolor paper texture – JPG, 300 DPI
- Compatible with any software that allows you to work with layers ( Photoshop, Photoshop Elements, Paint Shop Pro
- Note to the Lightroom users – you need a plugin that allows you to work with layers.
- Compatible with: Adobe Photoshop, Adobe Photoshop Elements
- File Size: 62.86 MB If you want you can also Download. Frames
We have shown you the Preview image below, in which you can see how amazing all its effects are.

Video tutorial:
Download the File Easily From the Download Link Given Below
Password is : dgpik.com

How to use Png Masks Frame in Photoshop
To use a PNG mask frame in Photoshop, follow these steps:
- Open your image in Photoshop.
- Open the PNG mask file you want to use.
- Select the entire PNG mask by pressing Ctrl+A (Windows) or Command+A (Mac).
- Copy the mask by pressing Ctrl+C (Windows) or Command+C (Mac).
- Go back to your original image.
- Create a new layer by clicking on the “New Layer” button in the Layers panel.
- Select the new layer and paste the mask by pressing Ctrl+V (Windows) or Command+V (Mac).
- Resize the mask to fit your image by using the Transform tool (Ctrl+T or Command+T).
- Once you’re happy with the placement and size of the mask, click on the Layer Mask button at the bottom of the Layers panel.
- Your image should now have the PNG mask frame applied to it, with the original image showing through the transparent areas of the mask.
You can adjust the opacity or color of the mask layer to create different effects, and you can also add additional layers or effects to further customize your image.